‘Practical’ Tactical Shooting Part I:
How You Shoot in your Practice Sessions
Welcome back, reader! This is the first in a new series of articles called ‘Practical’ Tactical Shooting. The goal of this series is to give you some basic tools and training tips to potentially help you react better, should you ever find yourself in that situation where you have to defend yourself or your home with a gun. A handful of articles won’t turn you into a Navy SEAL (though the principles here are some of the same ones that are used by elite forces), but these are some of the practical concepts that you need to use to succeed in those extreme situations.
Today, we’ll be talking about the way you shoot in your practice sessions. Later articles will talk about topics such as drawing the weapon, movement, tactical reloads, and proper use of cover. Let’s get started!
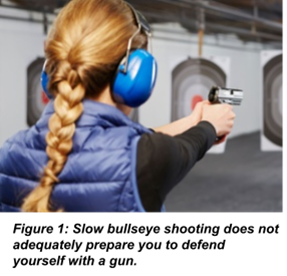
 Training for most shooters (even many that have a lot of experience) often consists of little more than going to the range, hanging a paper target (often a bullseye or maybe a silhouette) and shooting fairly slowly and deliberately at the center of it (Figure 1). Practice like that does have value in learning the fundamentals of shooting (grip, sight picture, trigger control), but doesn’t really prepare the shooter for using their weapon in a fight.
So how should you practice if you are training to defend yourself? I’ll get into that, but first, let me say that this series of articles is intended for folks who have shot enough that they are both familiar and comfortable with the fundamentals of shooting (and shooting safety) and shoot enough to have basic marksmanship skills. You don’t need to be an expert marksman, but you should be able to handle the gun and consistently put rounds in the chest area of a silhouette target at 15-20’, with typical ‘slow, aimed’ fire. If you’re capable of doing that, then this series of articles will lay out the things to consider and practice, to help you defend yourself with a gun. This is article one of the series, and here we’ll talk about changes you can make in your live-fire practice sessions that will help. In later articles, we’ll talk about things like gun handling (holster draw, reload procedures, clearing malfunctions), tactical movement, use of cover, and tactical dry fire work…but let’s get started on today’s session.
So with all of that in mind, where do you start? A good starting point is how you shoot at the range in your practice sessions… As previously noted, slow, carefully aimed shots at a bullseye (or even a silhouette) are a starting point, but are not even close to enough. In a real world defensive situation, you are likely to have to do things faster… meaning quick target acquisition, quick follow up shots, and potentially, quick transitions from one target (threat) to another. How can you practice for those things?
First, you’re going to have to get comfortable with shooting faster… but that’s much more than just pulling the trigger quickly. Shooting quickly but effectively (meaning putting rounds on target) starts with your sight picture. Whether you’re using open sights or a red dot, where your eyes go, the rounds will follow. To the degree possible, pick a small ‘sub target’ on your target, and lock your eyes on that. This takes eye discipline; don’t just shoot at the target in general. As Mel Gibson said in the movie “The Patriot”, ‘aim small, miss small’. Pick a specific, small point to aim at, and lock your eyes on that spot. On a live threat, that may be a specific button on the shirt, or the “V” where the shirt buttons at the top of the chest. On a target at the range, perhaps it’s a mark at the center of the silhouette. If there is no mark, then take a Sharpie from your range bag (you should have one there) and put a mark on the center of the silhouette. Keep your eye on that target; don’t fall into the trap of looking at your bullet holes… aim where you want to hit, not where you did hit on the last shot!
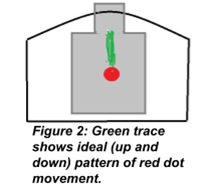
 The next element of the sight picture is getting a true understanding of what your sights are doing as you shoot, particularly as you shoot faster. To do this, you have to learn to pay attention to where the sights are at the moment that the trigger breaks, and where the sights move during the recoil and recovery phase (as you move the sights back onto the target). What you should see is modest movement in a controlled, consistent direction. Ideally, you’ll see the sights rise a little above the target during recoil, and they should quickly settle back to about the same place (Figure 2). If that is not the case, then you may need to adjust (and probably tighten up) your grip. Strive for strength and consistency in your grip, and you should begin to see the sights move in a consistent, predictable pattern. Some shooters may see the sights move both up and slightly to one side. While it’s ideal for the movement to be simply up and down, predictable consistency is the most important element. Once you understand what your sights are doing, and provided they are behaving pretty much the same from round to round, you can begin accounting for that movement as you increase the speed of your shooting by timing the follow up shot for the moment when the sight will settle back on the target. If you see your sight picture is moving all over the place (not consistently), then work on your grip and work on developing that consistency in fairly slow controlled fire.
Once you have an understanding of what your sights are doing as you shoot, you can then begin to shoot faster. As you increase your shooting speed, do your best to maintain good technique on the trigger pull itself. Some folks will tend to get a little wild and just ‘mash’ the trigger when they start shooting faster, which causes inaccuracy. All motion of the trigger finger should be at the second knuckle, with the trigger being pulled straight back, regardless of the speed. Shooting faster is something that some folks will be uncomfortable with at first; many new shooters get hung up on the notion of trying to make each shot perfect. As you shoot faster, that becomes more and more difficult. Stay with it; in time, the groupings will start to tighten.
There are two main types of rapid fire shooting; the first is called ‘cadence’ shooting, which involves (rapidly) gaining a sight picture for each round, then firing, quickly regaining that sight picture, then firing again. Cadence shooting can be done at virtually any pace, from very slow to pretty rapid. The key in cadence shooting is reestablishing that sight picture; this is where understanding what your sights are doing really comes into play. The more you understand exactly what the sights are doing, the quicker you will reestablish the sight picture, and the quicker you can shoot. This is where beginners to true defensive shooting should start. Start at a modest cadence pace, particularly while you are trying to get a feel for the sight movement. Once your sights are moving predictably and consistently, increase your cadence, even to the point of being slightly uncomfortable. If you only stay at a cadence that you consistently get good hits at, then you will never get faster; you’ll have to push the edges of your ability, in order to get better. This will cause a dip in accuracy, but work at it, and continually, over time, work into faster cadences that you can still get good hits with. Once you can get about 18 out of 20 rounds into a roughly fist sized area (about a 4”-5” circle) on target at a range of about 20 feet, at a cadence of about two rounds per second, then you are probably ready to move on. Two rounds per second may sound fast for those just starting, but it’s a very achievable speed for most shooters if they practice. Don’t worry if you are unable to do this at first… the trick is to practice at a cadence that is comfortable for you until you are getting that 90% hit rate (18 out of 20), then speed up a bit. Once you can do it at that speed, speed up again. Time yourself: to do this, load 10 rounds in your magazine, fire at a rate that you can get hits at, and have someone time you. With some practice, you’ll be able to get hits with those 10 rounds in 5 seconds.
Once you can shoot at a reasonably (not excessively) fast cadence of about two rounds per second, while still getting 90% hits at 20 feet, you are ready to move on to the next type of rapid fire, called ‘hammered pairs’ (some call it ‘double taps’). With a hammered pair, you are firing two rounds at very high speed; in fact, the second round is fired so quickly that there is no time for the sight picture. That is the biggest difference between hammered pairs and cadence firing; in cadence firing, you are acquiring a sight picture for each shot, whereas with hammered pairs, it’s one sight picture with two rounds. During cadence shooting, you can continue to fire at your cadence rate; with hammered pairs, you need to stop after the second round, and re-acquire the target picture. This will likely affect your accuracy on the second shot (though the first should be on target), but once you’ve mastered fast cadence, keeping the second shot of the hammered pair on (or at least pretty close to) target becomes achievable. Shooting hammered pairs will truly show how effective your grip and overall control of the gun is; with a good grip and some practice, the average shooter can get hammered pair groups within about 6-7” on a target at 20’ about 75-80% of the time. Really good, highly experienced shooters will tighten that up to 4-5” groups for hammered pairs at that range, or even better, at a 90% or better rate.
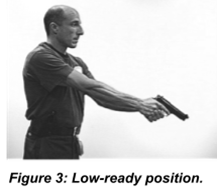
 Another thing to work on at the range will be target transitions. This means visually acquiring a new target and getting the gun on target quickly. While it may not be practical to have targets distributed at widely spaced locations at an indoor range, transitions can still be practiced. The very first transition that everyone must master is acquiring the initial target. Though most ranges don’t allow drawing from a holster, this can still be practiced by starting in the low-ready position (Figure 3), with the gun pointing downrange and at a 45 degree downward angle. All transitions begin with the eyes. Practice starting with your eyes down, then bring your eyes up and lock them on your aimpoint. At the same time, bring the gun up to that point; think in terms of pointing your trigger finger at the aimpoint that your eyes are locked onto. Since your trigger finger should be off the trigger and out of the trigger guard until the moment you shoot (always remember the gun safety basics!), you actually can point your trigger finger at the target. This can help getting your sight aligned; many new shooters often have a hard time finding their sights (or their
red dot) as they present the gun on target. This initial target acquisition is a key first step that many shooters don’t practice, and if unpracticed, will cost precious time at the moment that speed is needed the most. Practicing initial target acquisition at the beginning of cadence firing is a good way to develop this skill.
Once you’re comfortable with initial target acquisition, you can also practice transitions during cadence shooting strings. One easy way is to tape a Post It note at each of the corners and in the middle of your target, and practice transitioning with 2-3 shots per note. Remember, the transition starts with eye movement; shift your eyes from the target you are on to the next, then swing the gun to follow. Some folks will make the mistake of trying to keep their eyes on the sights as they move; this is slower and less efficient. Let your eyes move to the target a fraction of a second before moving the gun; then (quickly) ‘point’ to the target. Make sure you are practicing transitions both laterally and vertically, to the degree possible. Also make sure you are still getting hits at those transition targets. If not, then slow down till you get hits at that 80-90% rate, then speed up.
The final thing to mention here is measurement (and recording those measurements). In several places in this article, I talked about group size, and about the rate at which you are firing…these things need to be measured. You should always have a ruler and a stopwatch in your range bag, as well as a notebook. If you want to shoot better, you will need to make those measurements…and if you don’t write them down, how will you know if you are improving? While you can certainly measure your group sizes yourself, you may have to enlist the help of a friend or a fellow shooter at the range to time yourself. Once you have timed yourself a few times, you’ll get the feel for what slow or fast times are for you. Write that down, and practice for a few months…then see if you are improving.
That’s all for this time….I hope you’re back for the next article in the series! In the meantime, come out to shoot with us at Select Fire, and if you’ve missed any of our other articles, you can find them in the Posts section of our website, so go check them out! www.selectfiretrainingcenter.com/posts
Like this article? Please consider sharing and leave your comments below!
Select Fire Training Center (SFTC) is the premiere training center and indoor shooting range facility in Northeast Ohio. Dedicated to offering a top-notch facility with highly skilled instructors, a wide range of classes and a state-of-the-art shooting range experience. We are here to serve your needs, make you feel welcome and we do this by offering you true customer service by friendly, knowledge people.


Keep ARTICLES COMING — EVEN IF THEY APPEAR BASIC.
BASIC, EVEN VERY BASIC TRAINING IS THE BEST TRAINING AS EVERYTHING
GOING FORWARD WILL DEPEND ON THE BASICS. I AM TRAING
MY SECURITY TEAM WITH YOUR ARTICLES