‘Practical’ Tactical Shooting Part II:
Defensive Gun Handling
Welcome back, reader! This is Part II of our series on ‘Practical’ Tactical Shooting; if you missed Part I, you can go over to the Posts section of our website (https://selectfiretrainingcenter.com/practical-tactical-shooting-part-i/) and catch up there. As we said previously, this series is intended for the competent but not necessarily an expert shooter who wants to start practical training in the use of their firearm for self-defense. This short series can’t possibly tell you everything you need to know to do that, but it can give you some basics that you can practice on your own that may help you as you begin to train for real-life scenarios… and perhaps it will motivate you to train harder, train with purpose, and possibly even seek out professional training to help you in your quest.
Today, we’re going to talk about a part of tactical shooting that some folks may not necessarily consider when thinking about defensive firearms training gun handling. When the topic of defending yourself with a gun comes to mind, some folks may think of target transitions, shooting fast, and possibly even moving and shooting from cover. But the fundamentals of good gun handling are some of the building blocks of defensive handgunning, so we’ll unpack that topic in today’s article.
As a starting point for this discussion, we’re going to assume that you are in a situation where you’ve already made the decision that you need to employ your weapon, and that tactically, you have the physical space you need to do that (the observational and psychological processes that lead up to that point, as well as the tactical considerations of how to ‘make space’ if you are very close to your antagonist are outside the scope of this article). Once you are at that point, you’re going to need to draw your weapon.
The actual mechanics of the draw are going to depend on exactly ‘where’ your gun is…clearly, there is a very big difference between how you are going to draw your weapon from inside of a bedside night table, vs carrying on your person. There are even differences depending on whether you are carrying at the appendix position, vs on the hip, or in the underarm/shoulder position. In general, the concept is to clear the path to the gun, establish the grip, draw the weapon, and present to the threat. For the purpose of this article, we’ll discuss the draw process from the appendix carry position. You may need to tailor this to your specific situation, but the concepts are the same.
Drawing your weapon from its holster sounds simple, but like lots of other parts of shooting, there are different elements, all of which have to be done right, or else the end result is much slower, and less effective. Here, we’re going to consider the “draw” to encompass everything from the moment after you have decided to employ your gun, up to the point where your finger begins to touch the trigger. That definition may be a little broad, but it gives us a framework to start with. We can break that into four main pieces: footwork, uncovering the weapon, grip & withdrawal, and presentation.
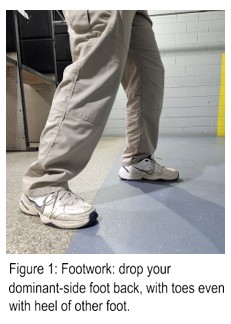 The first two elements (footwork and uncovering the weapon) can and should happen more or less simultaneously. To start, shift your dominant-side foot (if you’re right handed, this means your right foot) backward till you are in a “boxing” style stance; at the same time, bend your knees slightly and lower your weight just a bit (Figure 1). This will give you the basis of the Weaver-style stance, which is an athletic and comfortable fighting stance.
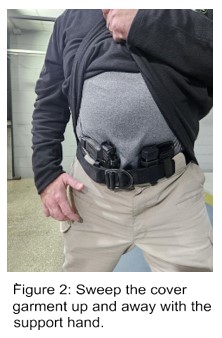
At the same time, your non-shooting hand should reach across your body and grasp your cover clothing at waist level, and just behind the gun. In one motion, sweep the clothing up high and out of the way; that hand can come almost up to chest level (Figure 2). You want to make sure that you’ve clearly exposed the gun and gotten the shirt/sweatshirt/jacket fully out of the way of your gun hand, and out of the path of the gun as you withdraw it. Again, this description assumes an appendix carry, while the footwork is the same, the ‘uncovering the weapon’ aspect will differ for hip, small-of-the-back, and shoulder carry.
 When it comes to establishing your grip (obviously, with your gun hand!) and withdrawing the weapon, there are two schools of thought. The fastest approach is to bring the gun hand just below the gun and ‘rake’ the gun from the holster with the fingers curled around the grip. A slightly different approach (which I personally favor) is to start with my gun hand slightly above the gun, and drive my hand down onto the grip, with my thumb sliding down between my belly and the grip. Once the grip is established, I then complete the draw stroke and withdraw the gun. I favor this because it allows me to ensure that I’m getting my hand high up on the backstrap, to help in establishing a firm grip. Arguably, it takes a small fraction of a second longer, but to me, the benefit of solidly establishing my grip will pay off in terms of not having to adjust my grip (or shooting with a poor grip, which is even worse). In either method, always make sure that your trigger finger remains outside the trigger guard through the whole draw stroke! I like to point my trigger finger along the slide parallel to the barrel axis, for a reason we’ll mention in a bit.
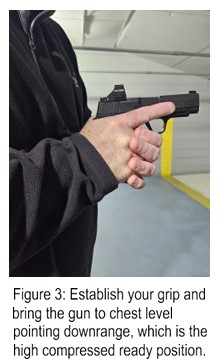 Once you’ve begun to pull the weapon, continue to bring it to chest level, which is about where your support hand landed after clearing your cover clothing. At that point, quickly establish your two-hand ‘master grip’ with the gun near your chest, pointed downrange; shift your support hand to your gun and establish that grip. At this point, you will naturally be in the high compressed-ready position (Figure 3).
This is a good time to talk about carry positions, i.e., how you can/should carry your weapon, once it’s drawn, in a tactical situation. For the sake of brevity, we’re going to limit ourselves in this article to just discussing three positions, the (previously mentioned) high compressed-ready position, the low-ready position, and one that many may never have heard of, the Sul position. There are other positions that more advanced classes teach, such as the temple index; these are valid and have usefulness in some situations, but for the sake of this article, we’re going to stay limited to the three most basic ones, as noted.
The high compressed-ready position, as we already noted, has the shooter holding the gun in their shooting grip, but with the gun up close to the chest (not quite touching the chest), with the elbows tucked in tight and touching the sides of the body. This position does several things; as the user is moving, it keeps the gun in closer to the body where it’s less likely to be grabbed, and is easier to control. However, the shooter can still fire from this position if need be (if confronted with a sudden, short-range threat), and can press out on a longer range target. If you find yourself responding to a threat in your home at night, this is an excellent choice as a carry position.
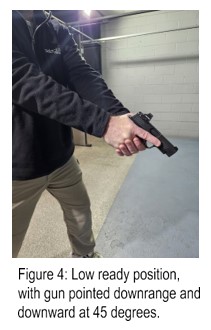 A secondary position that can be used in more open areas is the low ready position (Figure 4). This still involves having your shooting grip established, but this time the arms are extended, with the gun pointing forward but downward at about a 45 degree angle. It is a comfortable and safe carry position, as the muzzle is generally pointed downward…but will take a bit longer to employ if the shooter is surprised (compared to the high compressed-ready position), as the gun must be brought up to address the threat. This position may be more comfortable if there are clear lines of sight and you may not immediately need the ‘snap-shot’ ability that the high-compressed ready position affords, but be very careful to keep your finger off the trigger, especially if in a crowd.
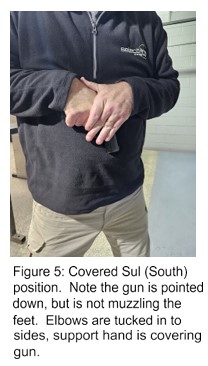 The final carry position we’ll talk about is the covered Sul (pronounced ‘Sool’) position, which means “South” in the Portuguese language. This position is highly useful when you are advancing through a crowd; if you’ve had to draw your weapon in a crowd, there is likely panic (perhaps shots have been fired, and you are advancing to find the threat), and you need to move securely through the crowd with your weapon drawn, but still protected. In the covered Sul position, the gun is gripped with the dominant hand and held with the muzzle pointing straight down (‘South’, hence the name Sul), and the frame of the gun held high on the abdomen. The support hand is used to cover the weapon, which is why it’s called ‘covered Sul’. The elbows should be tucked into the sides (Figure 5). This position will feel a bit awkward, due to the wrist angle required on the dominant hand, but is a highly secure position to carry through a crowd, as it provides maximum protection against someone grabbing the weapon. It also is at least somewhat discrete, as the gun is largely covered by the support hand, so it is less noticeable in a crowd than the other positions. Another useful byproduct of this position is that it lets you ‘shoulder’ people out of the way in a crowded situation without using your hands (which are holding and protecting the gun), which can be useful when advancing through a confused and panicked crowd.
From any of these carry positions, the shooter must then practice pressing out on the target. From high compressed ready, it’s pretty easy: simply extend the arms, bringing the sights up to eye level with the elbows just slightly bent. Make sure you present the sight to your dominant eye; the target, your sights, and your dominant eye should all be in a straight line, with your head up. Likewise, from the low-ready position, simply bring the gun to the target. Again, make sure your elbows are firm but slightly bent, and bring the sights up to eye level.
From the Sul position, it’s slightly more complicated, insofar as you have to establish your support hand’s shooting grip on the weapon. From covered Sul, rotate your support hand over the backside of your dominant hand, while rotating the gun upward and muzzle forward. Never bring your support hand in front of the muzzle! All of this should be done with the gun at essentially chest level; when you establish the grip from the covered Sul position, you will essentially be transitioning into the high compressed ready position, from which point you can press out onto the threat.
In all cases, make sure your trigger finger is out of the trigger guard (off the trigger!) and pointing along the barrel axis. Get in that habit, and don’t ever break it! This is first and foremost for safety (remember, there are NO accidental discharges, only negligent discharges), but it also can help in finding your sights: when you press out, simply point your extended trigger toward the target as you bring the sights up to eye level. This can be an aid in quickly acquiring and aligning the sights, which is something that new shooters sometimes struggle with doing quickly.
No discussion on drawing a weapon would be complete without at least a few words on re-holstering. Many negligent discharges happen during the draw or especially the reholstering phases…so when reupholstering, take special care to keep that finger out of the trigger guard!
To reholster with appendix carry, first start by sweeping the cover clothing away with the support hand, just like during the draw stroke. Sounds like the beginning of the draw stroke, but that’s where the similarity ends. The difference from simply the reverse of the draw stroke is that while reholstering, you need to follow the process with your eyes, and move slowly and deliberately. Look the gun directly into the holster, and carefully guide the weapon into it. Speed was something to be strived for during the draw stroke; careful, deliberate actions are the order of the day when reholstering.
The final topic we’re going to cover here is reloads and malfunctions. Handling those situations is a crucial part of tactical gun handling, and something that must be practiced. There are two types of reloads; we’ll briefly cover both. There are some similarities in how both reloads and malfunctions are addressed, which we’ll also cover.
Reloads can be classified as either a tactical or emergency reload; the difference is that a tactical reload is made by the choice of the shooter when a) he suspects he may be running low on ammo, but is not yet out and b) when he is at a point in the fight where there is a moment to reload (i.e., not actively engaging the threat). An emergency reload is when the shooter runs the magazine dry during the fight: clearly, it amounts to an emergency! In that case, he must do the reload on the spot, regardless of conditions. In that respect, an emergency reload is like handling a malfunction: when it happens, it has to be addressed, whereas the tactical reload is a choice of convenience. In all cases, it’s best to perform the reload or malfunction clearance behind cover (1st choice) or concealment (2nd choice). Lacking either of those, a ‘tactical displacement’ (move several steps to the side) can be helpful; we’ll talk more about movement in the final part of this series of articles.
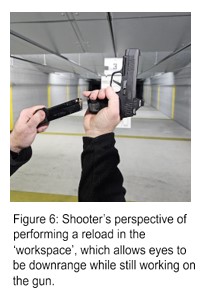 In all reload and malfunction clearance maneuvers, bring the weapon up into your ‘workspace’, which is the area about a foot in front of your face, with the weapon pointed up (Figure 6). This ‘workspace area’ allows the shooter to keep their eyes more or less down range (and therefore maintain his situational awareness) even while working on the gun, to a far greater degree than if the gun is brought down to waist level to work on. It’s a normal tendency for shooters to bring the gun down during reloads or malfunction drills, and then naturally to bring your eyes down as well, but this will severely limit your ability to maintain awareness of what the threat is doing.
Both types of reload start the same; bring the gun into your ‘workspace’, thumb the magazine release with your dominant hand, and remove the magazine with your support hand. Here’s where the two reload types differ. In an emergency reload, that magazine is empty, so simply discard it. In a tactical reload, you should pocket the magazine, as it still has rounds that you may need later. Pocketing that magazine may take just a tiny bit longer, but given that you chose to do the tactical reload, you have that extra second to stow those rounds, which may be a difference maker later. In either case, you then grab your fresh magazine and reload. Remember, if you
did a tactical reload, you still have a round in the chamber, no need to cycle the action (or release the slide). If it’s an emergency reload, the slide is likely locked back, so you’ll need to either thumb the release button/lever, or pull and release the slide.
In the case of a malfunction, bring the gun into your workspace, and work the problem. If it’s a simple malfunction, a variation of the standard “tap, roll, rack” drill may clear the problem; the variation is that since the gun is pointed upward in your workspace, the “roll” portion of the drill involves rolling the gun forward (muzzle downrange) as well as to its side, to let gravity help pull the spent casing out. More advanced malfunctions may require the magazine to be removed before clearing the slide.
It should be clear by this point exactly why I suggested you use cover or at least concealment (if possible) for any of these maneuvers; otherwise, you are at least briefly in the open without a functioning weapon. Better to have some cover, or at least concealment if at all possible!
‘Dry’ (no ammunition) practice should be done extensively by the shooter, going through each of these processes, starting with the draw stroke, then transitioning to the different positions, pressing out toward the threat, then moving for cover/concealment and practicing reloads and malfunction clearance. Repetition to build muscle memory is the key: remember, if you are called on to do these things in an actual fight, you’re going to be under enormous stress, which will really degrade your ability to perform. You need to practice to the point that these drills can be done quickly, cleanly and confidently. With some dedicated practice, you’ll get there.
That’s all for now… I hope you’re back for the final article in the series! In the meantime, come out to shoot with us at Select Fire, and if you’ve missed any of our other articles, you can find them in the Posts section or our website, so go check them out!
Like this article? Please consider sharing and leave your comments below!
Select Fire Training Center (SFTC) is the premiere training center and indoor shooting range facility in Northeast Ohio. Dedicated to offering a top-notch facility with highly skilled instructors, a wide range of classes and a state-of-the-art shooting range experience. We are here to serve your needs, make you feel welcome and we do this by offering you true customer service by friendly, knowledge people.
