‘Practical’ Tactical Shooting Part III:
Defensive Movement
Here we are at the final installment (Part III) of our “‘Practical’ Tactical Shooting” series…welcome back! If you’ve missed Parts I or II, you can find them on the Posts section of our website (https://selectfiretrainingcenter.com/practical-tactical-shooting-part-i/) and catch up there. The purpose of this series is to help you think and train in ways to improve your skills, should you ever need to use a handgun to defend yourself. I hope you find them interesting and helpful!
In this final article, we’re going to cover a few aspects of tactical movement. Like the other skills we have covered (tactical shooting, and gun handling), this is an area that you may have heard things about (for example, the cliche ‘get off the X’), but you may not know exactly the ‘how’ or ‘why’ behind it. And just like the other skills we have touched on, understanding and applying these skills can be the difference between successfully defending yourself against the threat, or having a much worse outcome… So let’s get started!
First, let’s talk about ‘why’ you need to use defensive movement…the reason is simply to improve your position in the fight. You need to use movement to improve your fighting position, and give yourself an advantage against your opponent; you don’t need to make moves just for the sake of making moves. The first thing we’re going to address is the notion of ‘get off the X’, which is a somewhat common statement that you’ll hear people that are trained (or people that want you to think they are trained) say. What does that mean? Where does that statement come from?
‘Get off the X’ is a statement that really means “get out of the ambush zone”. It’s a military phrase that comes from the idea that the enemy will mark “with an X” the spot on their map where they want to ambush you. They chose this spot because it gives them an advantage, so ‘get off the X’ means get away from that spot which is advantageous to them. In our situation, a better way to think about that (as previously noted) is “improve your fighting position”(Figure 1).
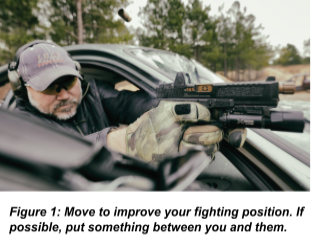 In the personal defensive context, we can “get off the X” in several ways. First, if possible, get out of the situation. If you can avoid the fight by getting away (even if that means running away), that’s nearly always the best option to make sure you’re not hurt, and also avoid any legal complications that can arise (even from legally defending yourself).
Of course, you may find yourself in a situation where that’s not possible or acceptable (perhaps you have a loved one present and cannot escape). In this case, your first movement should be to improve your tactical situation. If possible, put something between you and the threat. Make the threat have to “do something” to get to you… put a parked car or tree between you and the threat… shove a chair or table into their path as you step back; anything (depending on your surroundings) that gives you a tactical advantage, even for a brief moment. The notion is to buy time and create space between you and the opponent; then use this time and space to draw your weapon to defend yourself, and if possible, fight from a tactically-improved position. If the threat presents itself suddenly and up close, it may mean a hard shove to their chest or a palm strike to their face and then a quick step back for you, to create the space to execute your draw stroke. Each situation is different, but decisive action to start the engagement can take back the initiative from the attacker (who by definition had the initiative to begin with). The point, which we’ll continue to come back to, is to use movement to improve your fighting position and give you an advantage.
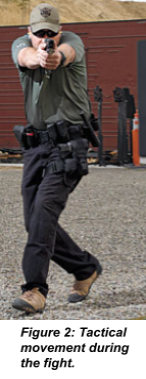 In the case where your opponent is armed with a gun and shooting at you, movement takes on a different level of importance. While it may seem obvious to move when you’re getting shot at, it can be easy to become so focused on making your own shots that you fail to move. In general, if you’ve drawn your weapon and fired 2-3 rounds and the threat is not ended, it’s probably a good idea to displace (meaning move) in some fashion; if cover is available, use it! (more on cover in a moment). However, even if no cover or concealment is available, it’s still useful to move a bit. How much should you move in a situation where cover is not available? Opinions will vary, but displacing by 6-9 ft from your original spot is a good starting point. Why will this matter? By moving, you are forcing your opponent to track you and readjust their aimpoint. Remember, in the heat of battle, your fine motor skills (like tracking and aiming at a moving target) will be diminished because of the adrenaline in your system, but so will your opponent’s skills. We also know that most street crime is committed by largely untrained individuals; if you are training as you should, you should have the advantage if both you and your opponent have to re-acquire your target after moving. Firing 2-3 rounds then displacing is then a good compromise, briefly giving you a stable shooting position, then moving to help disrupt the opponent’s point of aim (Figure 2).
A great drill to work on this is the “9-in-9” drill, which involves firing 3 rounds, displacing, firing another 3, and displacing again before firing the final 3 rounds. This drill is similar to the famous “Bill Drill” that some tactical shooters use (shown here on YouTube: https://www.youtube.com/watch?v=IEwC-NSUtXY), but it takes it a step further by adding movement. Due to the lateral movement of the drill, this may need to be done at an outdoor range (shown here: https://www.youtube.com/watch?v=nnaBVQ-dBVc). Shooting this drill with both speed and accuracy takes practice, but it’s a good practical displacement drill. This drill can also be done with dry fire practice, which should already be a big part of your training routine.
This is a good point to talk about cover and concealment… which are not the same thing. Cover is something solid that you can get behind, which will protect you from incoming rounds (like the engine block of a car), while concealment may hide you but won’t stop those incoming rounds (like a bush, or often even a wall in a house). Concealment is better than nothing, but having real cover is obviously much better than concealment.
But assuming that cover is available, what is the right way to use that cover? Hollywood doesn’t always get it right… The first mistake that is usually made is to get too close to the cover. When shooting behind cover, you need to be 3-4 ft behind the cover. Never approach the cover and put your arms around it to shoot! Being too close to the cover limits your ability to move quickly, and also limits your field of view of the engagement… it also limits peripheral vision of what is happening on your side of the cover… so stay back a bit! A good rule of thumb is that with your gun extended, the barrel of your gun should be 6 inches to a foot away from the cover. The key benefit of cover is that it stops the opponent from being able to shoot you… as long as that cover is between you and the threat! That seems obvious, but when it comes to shooting from behind cover, many untrained shooters (as well as many Hollywood actors) expose far too much of their bodies. The goal is to present as little of yourself to the adversary, while still being able to make the shot. Simply stepping to the side of the cover and shooting negates the value of the cover. So what should you do? What is the right way to use cover?
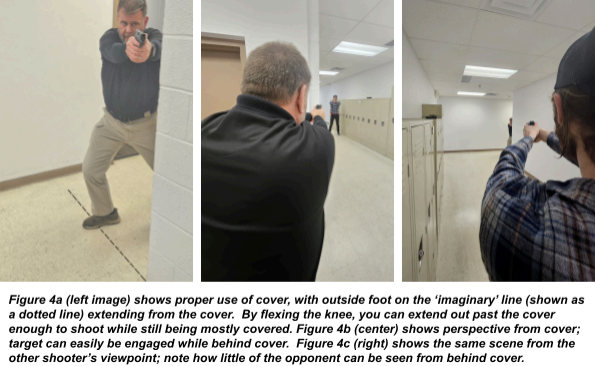
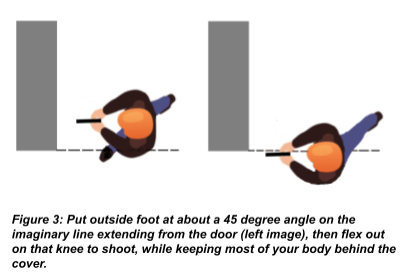 In a short article, we can’t address all situations but we’ll discuss a common one. When using cover such as the edge of a wall, imagine a line coming straight back from the edge of the opening. Standing about 3-4 feet from the wall, put your outside foot ‘on’ that line, at an angle to the opening (Figure 3). That foot angle is important; by doing so, you can lean out by flexing down that knee, which will expose only the minimum part of your head and upper body needed to expose your gun. Foot placement and angle are crucial; if your foot is outside of that imaginary line, too much of your leg will be exposed (Figure 4a). If the foot isn’t angled, then you’ll be forced to bend at the waist, and expose more of the upper body to return fire. Doing this properly allows you to ‘flex’ that knee and get out to take a shot, and then quickly return behind the cover as needed (for example, to reload or clear a malfunction). Figures 4b and 4c show both the point of views that you and your adversary will have if you do this properly; note how little of your body is exposed if done properly figure 4c), while still being able to make the shot.
Using cover properly is important, but there could be (and often are) situations where you have to advance through a building or structure, searching either for the threat or for friendlies. This could easily be the case if you hear a noise in your home, and you have to investigate it. Clearing your house will require you to address a series of ‘fatal-funnels’: these are the openings (generally, doorways) that must be used to enter or leave a room. They’re called ‘fatal funnels’ because these are obvious areas that someone in the room can aim at, focusing fire where someone has to enter. So what is the best (meaning safest, and most effective) way of addressing a ‘fatal funnel’?
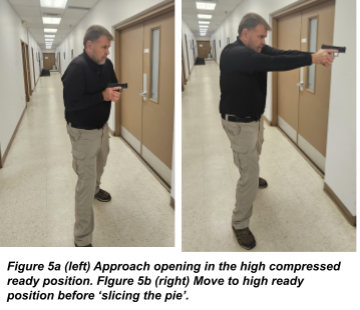 The solution is called ‘slicing the pie’. This is a tactic where you are starting at one edge of the opening, and slowly clearing a small arc (‘pie slice’) at a time. ‘Slicing the pie’ starts by approaching close to the wall; when you get about 3-4 feet from the opening, push out from the high compressed ready carry position, which is the carry position you are likely to be using as you move through the structure (shown in Figure 5a) into the high ready position aimed toward the opening (Figure 5b). Take a small step laterally away from the wall, which will allow you to see into the room by a small angle. Pause, and sweep through the visible angle into the room with your eyes, searching for threats. There are differing opinions on the pattern that your eyes should search; I suggest you start your visible search at waist level, then glance downward, then a quick glance upward. The reason for that pattern is that starting at waist level you are most likely to see either a standing or crouching threat; sweeping the eyes down will confirm no low threats, and while you may need to check the higher areas in ‘some’ situations, there is probably less likelihood of a high threat in most house-clearing situations. Be aware of the situation, though; if there is any possibility of a threat being above eye level (such as going into a room that has a second floor overlooking it), don’t forget to check there.
Perform that visual search at every angle; pause long enough at each spot to do a quick, but thorough visual search of the new angle that has come into view. Be ready to engage any threat that is seen. Once that small sector is cleared, take another small lateral step, but maintain your distance to the edge of the doorway (about 3-4 ft); don’t get too close to the edge of the door (sometimes called the axis of the funnel). Figure 6 illustrates this.
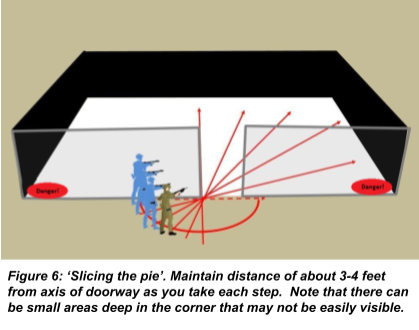 Once you have swept through all of the angles (you should now be on the opposite side of the doorway from where you started), you have ‘sliced the pie’. On larger rooms, it is still possible that a threat is located in the deep corners (along the insides of the same walls as the doorway, shown in red in Figure 6), since you may not be able to see fully to the inside along those walls; on moderate sized rooms (as is likely the case in a house), you can generally see enough to be confident that you would detect a threat hiding along the wall, but care should taken when entering large space, that a threat is not hiding in the deep corners.
The topic of tactical/defensive movement is much larger than what can be presented here… there just isn’t enough space in a short article to cover things like complex hallways with multiple doors, stairwells, open areas with multiple sources of concealment and other considerations. However, this article (and the overall series) was meant to give some basic insights, and give you a starting point on this topic. I strongly encourage you to practice clearing your house or apartment; that provides good general tactical practice, and also familiarizes you with how to do it (in your own space) in an emergency. Think through the steps of slicing the pie when you approach doorways; think about displacement if you find an attacker and are exchanging fire. If you have access to a range where you can move and shoot, working on the Bill Drill and the 9-in-9 Drill (both mentioned previously) will be helpful. If you want to take your tactical/defensive capabilities to the next level, getting a little professional training is also a great idea!
I hope you’ve enjoyed this series on ‘Practical’ Tactical Shooting; check out all of the other Posts on our website, and be sure to come train and shoot with us at Select Fire!
Like this article? Please consider sharing and leave your comments below!
Select Fire Training Center (SFTC) is the premiere training center and indoor shooting range facility in Northeast Ohio. Dedicated to offering a top-notch facility with highly skilled instructors, a wide range of classes and a state-of-the-art shooting range experience. We are here to serve your needs, make you feel welcome and we do this by offering you true customer service by friendly, knowledge people.
