Cleaning Your Gun:
How Often Do You Need To Do It? What are the ‘Crucial’ Parts?
Cleaning your gun is a task that many gun owners dread, especially new or infrequent shooters. Most gun owners recognize that they “should” clean their guns… but how often is it really needed? Also, what are the “important” parts to clean?
Like many things in life, there are different opinions on this topic. In the military, it’s generally taught that the gun must be cleaned every time it is used…. but is this really necessary? The advice we often give at Select Fire regarding how often you should clean your gun comes down to the answer to one question: how important is it that your gun operates? Of course, everyone wants the gun to work whenever you pull the trigger, but most people would recognize that it’s more important for the weapon to function properly when it’s being used in defense than it is when you’re just practicing or having fun at the range.
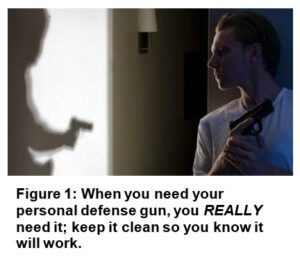 That being said, how often do you need to do it for each case? My opinion is that if I’m going to count on a gun for defense (be it personal carry, or even accessible for home defense), then I want to leave NOTHING to chance (Figure 1). If I fire even one round through my ‘carry’ gun (same for a home defense gun), then I clean it. If or when that time comes that I must use that weapon in defense of myself or my family (and hopefully, I will never need to), then that gun MUST fire, and I’m not willing to take even the slightest chance that it won’t. Modern firearms are reliable enough that they nearly always fire even if fairly dirty, but my life (and my family’s lives) are worth enough to me that I will take the 5-10 minutes it takes to clean my weapon, every time.
On the other hand, with guns that I use only for range use I’m willing to be just a little more casual about how often I clean them. In the unlikely chance that those guns suffer a malfunction because I didn’t clean it, it’s not that big of a problem; nobody’s life is in danger. I can simply take my time, fix the problem, and move on. So, guns that I only use for fun at the range I may clean every 2-3 times that I fire them, provided that it won’t be too long between range sessions. The reason for this “time limit” between cleanings is the second reason for cleaning guns…not only do you want to ensure proper function, but you also want to protect and preserve the weapon’s value and appearance. Neglecting maintenance on a gun for an extended period can lead to corrosion and excessive wear, which degrades its appearance, value, and potentially even its’ service life. That being the case, it’s a good idea to clean and lubricate a gun if it won’t be used again for 2-3 weeks, even if it’s only been used in one shooting session with limited rounds. How you store the guns is also a consideration; if they are stored in a humid or dusty environment, they should be cleaned more often, just to preserve them.
So now that you know ‘how often’ you should clean your gun, what are the key parts that need to be cleaned? Do you need to break the gun down to every little screw, spring, and lever to clean it?
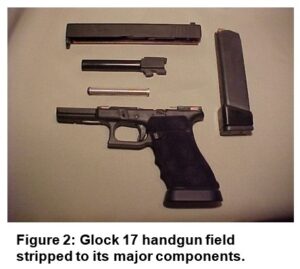 Generally, the answer to that is no. A basic “field strip” of the gun will usually allow cleaning of the most crucial areas, provided that the weapon wasn’t dropped into mud or immersed (Figure 2). For most semi-auto handguns, “field stripping” means removing the slide, operating spring, and barrel. Deeper disassembly than this can be done but is often not necessary.
When preparing to disassemble and clean your gun, always make sure the weapon is completely unloaded first! Many accidents have happened with someone assuming a gun was unloaded before beginning disassembly. Always remove the magazine and rack the slide repeatedly to clear anything from the chamber, then lock the slide back and visually inspect the chamber to make sure it’s clear. Until the gun is completely disassembled, still observe normal safety procedures, and make sure to keep it pointed in a safe direction.
Takedown (and reassembly) procedures can vary by make and model of firearm, so make sure you are familiar with how to field strip your weapon. The owner’s manual is the first place to start; there are also many good YouTube videos that illustrate how to disassemble and clean nearly any type of firearm imaginable. Using these videos can be especially helpful to visualize the processes in disassembly and reassembly.
Materials Needed
So, what cleaning materials will you need to clean your gun? To start, you’ll either need some powder solvent and gun oil, OR you can use a product called CLP (which stands for Clean, Lubricate and Protect). One nice aspect of CLP is that it functions as both a cleaner and lubricant, whereas if you use solvents (like Hoppes No. 9, a traditional favorite) then you also must oil the gun after you clean it …CLP does both in one step. For really dirty guns, you may need to use solvent, though, or a product such as Powder Blast (made by the same folks as CLP). If the gun is cleaned frequently, solvent or Powder Blast is usually not needed, and CLP will do the trick. If the gun is really dirty and you have to use those products, be sure to go over it afterward with gun oil or with CLP to provide lubrication and corrosion protection.
To apply and use the cleaning and lubrication materials, you’ll need gun patches (which come in several sizes, based on your gun’s caliber), a soft rag, and either a bore snake or bore rod. Both of those come with small attachments such as a bore brush or fixture to attach the patches. A gun brush is also quite helpful; these usually come with a wide brush for larger areas, and (on the other end) a narrow brush for getting in tight places. However, an old toothbrush can be substituted for the gun brush (though you will not want to use that toothbrush for its original purpose after this!).
A couple of additional items which sometimes come in handy, though not really required, are a small borelight, for illuminating the inside of the barrel, and a set of dental picks, which can be handy for scraping carbon and filth out of small grooves and hard to reach places.
So, what are the parts that are really crucial to clean?
As previously noted, you generally only need to field strip your gun. Generally, you do NOT need to strip it down to every single little part… in fact, taking apart the trigger assembly/fire control group and even striker/firing pin assembly are often not recommended. If the gun is otherwise well maintained, simply disassembling it down to the “field strip” level will allow you to clean the crucial areas. Deep disassembly should only be done by knowledgeable folks such as an armorer or gunsmith, and unless there are problems, this rarely needs to be done.
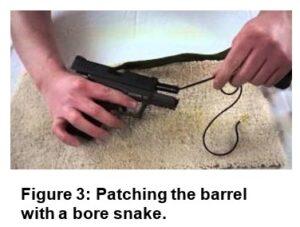 After field stripping the gun, the first thing to clean is the barrel. Often simply ‘patching the barrel’ with the bore snake or cleaning rod will suffice (Figure 3). To do this, soak a patch with CLP or solvent, pull it through, and examine it; this will likely need to be done three or four times, until it comes out looking pretty clean. Then do the same thing with a dry patch and verify that it’s clean. You can then use a bore light (or simply hold the barrel up to a light source) and look through it: you should see a very clean, shiny surface, and should easily be able to see the rifling grooves, with no dirt or debris visible. If there appears to be any dull, dirty areas, attach a brass bore brush to the rod or snake, and pull that through. Always pull patches and brushes from back to front (chamber to muzzle); this helps protect the crown of the barrel (the end part) from getting scratched, which can negatively affect accuracy. If you need to use the brush, you will also need to use one or more patches with CLP (or cleaner) on it afterward, followed by one or more dry patches. Continue this process (patching and brushing) until the barrel is completely clean, with no dirt visible anywhere. If the gun wasn’t too dirty, two or three patches with CLP, followed by 2 or 3 dry patches will often do the job. If you used solvent or Powder Blast, then make sure you lubricate the barrel afterward; just soak a patch with CLP or gun oil, and pull it through the barrel a few times, then patch the barrel with a dry patch to remove any excess oil. The last patch through the barrel should come out completely clean; if it’s not, keep using fresh patches until it is clean.
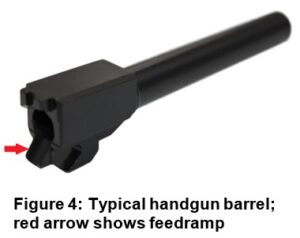 After you clean the barrel, clean off the feed ramp, which is the little angled piece that guides the nose of the bullet into the chamber (Figure 4). It should be completely cleaned, as this is one of the areas (not the only one) that can cause feed issues and jams. After making sure that the barrel and feed ramp are both clean (and lubricated), wipe down the outside of the barrel with a bit of oil or CLP, and wipe off the excess. The idea is to leave a thin film of oil for corrosion protection, but the components do not need to be (and should not be) wet with oil.
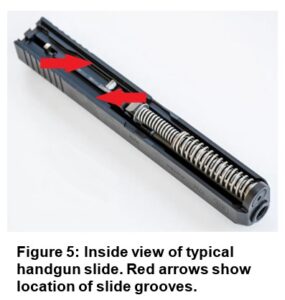 Next, clean the grooves milled into the sides of the slide (Figure 5), and the mating surfaces on the frame. The action slides back and forth using these grooves, so clean (and lubricate) them using the gun brush or toothbrush. If dirt is caked in there, this could be a place to use the dental picks, though a brush (especially the narrow end of the gun brush) is usually sufficient. As with all metal surfaces, make sure there is a film of lubrication, but wipe off the excess, both to keep your gun cases (as well as your hands and clothes) clean, but also to avoid attracting dust to wet surfaces.
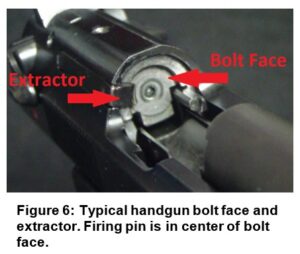
Next, use the cleaning products and the brush to clean off the bolt face, and pay special attention to the extractor mechanisms at the sides of the bolt face (Figure 6); if these get caked with dirt, the bolt will not pull out the spent cartridge, and you’ll get ejection problems. A quick scrub with a little CLP, using the thin end of the gun brush will suffice. Make sure you wipe it out afterward with a cloth or patch to get out excess oil and any loose debris.
 In general, examine the gun while you have it apart, looking for signs of wear on moving parts. Make especially sure those areas are clean and have a film of lubrication on them, to minimize future wear.
Next, inspect and clean with the brush all the areas of the trigger assembly and the internal parts of the frame that you can get to. Occasionally (perhaps every 3rd or 4th time you clean the gun) place a tiny bit of lubricant on the hinge points and moving surfaces of the trigger group that you can see, but don’t overdo this. When done, wipe everything internal down (that you can reach) with a clean, non-lint cloth, leaving that thin film of lubrication.
Finally, you can reassemble your gun (if needed, refer to a YouTube video on takedown and reassembly of your model). Cycle the action and dry fire several times, to do a functional check. Then wipe down the exterior of the gun (taking care not to get oil on your optics, if you have optics installed), and you’re done!
Many new shooters think of cleaning their guns as a chore… but experienced shooters often come to enjoy the exercise; not only are you maintaining the value of your investment and decreasing the chances of malfunctions, but by doing the cleaning process, you “get to know” your weapon better, and you’ll find that you become much more comfortable with clearing malfunctions as a result, as well. So, with that in mind, show your gun a little love and don’t hesitate to take it apart and clean it. Dive into your user’s manual or watch a YouTube video on it; if you do get stuck or have problems, you can always bring the gun into the range and have an armorer help you out, but cleaning and maintaining your gun is a skill that every shooter and gun owner needs to have!
Thanks for reading this article! Check out our previous articles on our website, which you can find at www.selectfiretc.com/posts. See you at the range!
Like this article? Please share and leave your comments below!
Select Fire Training Center (SFTC) is the premiere training center and indoor shooting range facility in Northeast Ohio. Dedicated to offering a top-notch facility with highly skilled instructors, a wide range of classes and a state-of-the-art shooting range experience. We are here to serve your needs, make you feel welcome and we do this by offering you true customer service by friendly, knowledge people.
