Hitting the Target: The Big Three Factors
Part I: Grip
“Hitting the target” is always the goal when you shoot, whether you are at the range shooting paper targets, plinking steel targets outdoors, or (in the most serious situation) actually defending yourself in a real-world scenario. While a lot of factors go into whether or not your rounds hit where you want it to, we’re going to discuss three key factors that play the biggest roles in “hitting the target” for handgun shooters. This article will be Part I of a three-part series, dealing with the ‘Big Three’ factors of handgun accuracy: grip, sight picture, and trigger pull. Today, we’ll be talking about grip, and we’ll break it down in some detail, because it is very important! In fact, some shooting experts call grip the single most important factor in shooting, and often the most overlooked. In later articles, we’ll talk about sight alignment and trigger pull. Other factors can also contribute to accuracy (body position/stance, breath control, etc.) but the biggest gains in accuracy for most shooters will be seen by paying a lot of attention to the ‘Big Three’.
Why are we talking about how to grip the gun? Lots of reasons… but mainly it’s the foundational step to being able to properly aim and control the gun. A good analogy is that the grip is to shooting what the foundation is to a house: it’s what everything else is built upon. If your grip on the gun is not right, your chances of putting bullets where you want them (on both initial and follow up shots) are low. Grip will affect the steadiness of your sight picture, as well as how well you control the gun’s recoil, and how fast you can get back on target for follow up shots. So, what’s the right way to do it? Like many things, some folks will have differing opinions on some points, but here’s some guidelines that are generally accepted by most good shooters.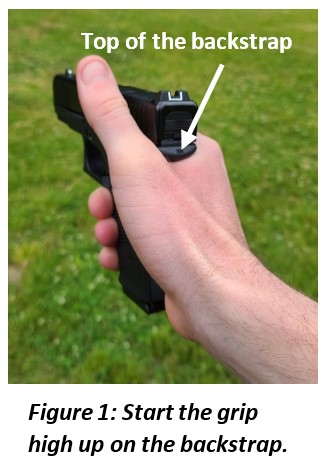
To begin, position your dominant (control) hand with the web between your thumb and first finger as high up on the backstrap as possible… though not over it (Figure 1). Any space between your hand and the top of the backstrap is bad; the higher you can grip it, the more control you will have over the recoil forces, which are going to follow in the same direction that that slide moves. Keeping your hand up high on the backstrap will help keep the recoil under control, which is crucial when you try to get the gun back on target for follow-up shots.
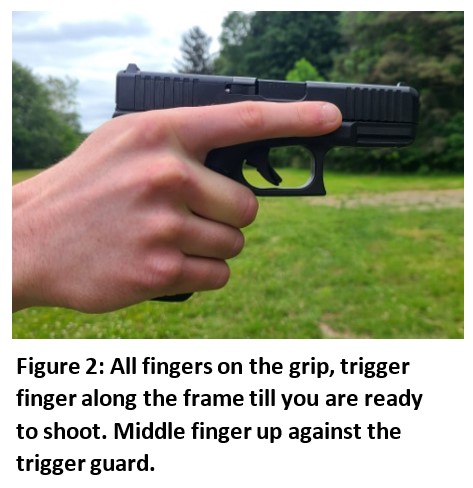 Next, wrap all your fingers around the grip of the gun, with your trigger finger pointed forward along the frame (keep it there until you are on target and ready to shoot!). All three support fingers should fit onto the grip of the gun, though on some small, sub-compact guns, the pinky finger may be either off or just barely on the grip (Figure 2). A good solution for that problem is to use extended magazines for those sub-compacts, which allow you a bit better grip and control by getting the little finger engaged. Also, make sure your middle finger is up high against the bottom of the trigger guard.
For single-handed shooting, simply point your dominant hand’s thumb forward, along the frame…but it’s been shown time and again that using both hands greatly increases accuracy, so unless there is no other choice, which is rarely the case, always use both hands!
For the more common (and highly recommended) two-hand grip, you need to initially ‘flag’ your dominant hand’s thumb upward; this will make space for the thumb on your support hand (Figure 3). We’ll come back to the thumb on your control hand, after we get your support hand positioned properly.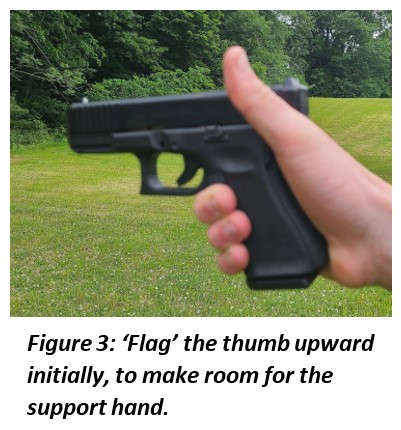
Many people (though not all) generally grip the gun reasonably well with their dominant hand, but problems often come with the support hand. Older shooting styles sometimes advocated the ‘teacup’ support hand approach, where the palm of the support hand was placed underneath the bottom of the magazine (base of the grip) and the support fingers and thumb braced at the sides. Another somewhat ineffective method was to use the support hand to brace around the wrist of the dominant hand, in an apparent effort to stiffen the wrist. Neither of these approaches support the gun effectively and should be avoided.
So where does the support hand go? Finding the right placement of the support hand (or ‘indexing’ it) is the key. This is where some folks will have different opinions, but the key is to find a repeatable spot that you can feel, which will then place your support hand in the right place. One way to do this is by putting the fingertips of the support hand at the base of the knuckles of the dominant hand. By doing this, the hand will naturally fall into the right position; then just wrap your support hand around the gun, over the dominant hand’s fingers.
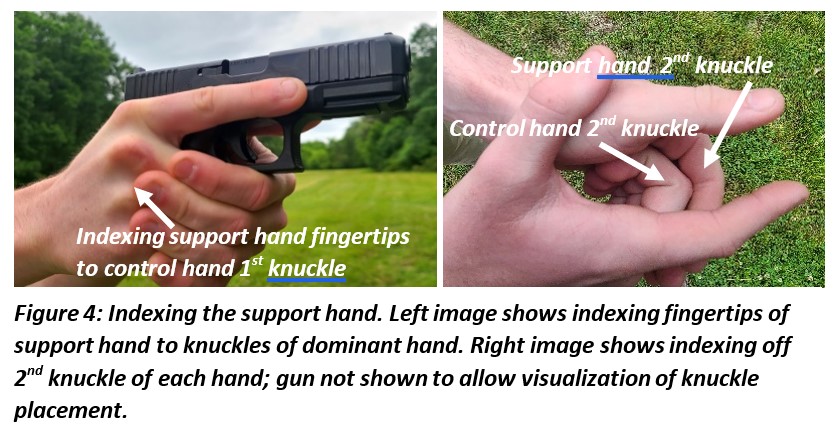 For those with smaller hands, it may be better to index by putting the 2nd knuckle of the support fingers over the 2nd knuckle of the control hand, as shown in the image below (Figure 4). Everyone’s hands are a little different, so you may have to find the index point that works best for you. The main thing to remember is that your grip has to be the same every time to be effective, so find that index point every time! The best index point is one that you can feel, so that you don’t have to look at it while you are gripping (and then drawing) your gun. Also, make sure that your first finger on the support hand is up high, against the trigger guard. The thumb of the support hand should extend forward, along the frame, and on many guns finds a nice index point on the guns’ takedown lever (though this is not always suggested as a primary index point, since some guns, such as Glocks, don’t use takedown levers). You can press inward with the support thumb against the frame; this will help counteract the relatively common tendency to miss low and left for right-handed shooters, or low right for lefties. That tendency is especially common when attempting faster follow-up shots, and additional pressure from the support hand thumb on the frame will help minimize it.
With the fingers and thumb in this position, the ‘meat’ at the base of the support hand should now nicely cover the part of the grip that is not covered by the fingertips of the dominant hand. The goal is to have all of the grip covered; nothing should be uncovered. An easy way to see if your hand is in the right spot is to tilt the gun up and look at it from the top; the end of the support-hand thumb should be even with the end of the trigger finger, along the frame. This was illustrated in the right side image of Figure 4 (though no gun was shown).
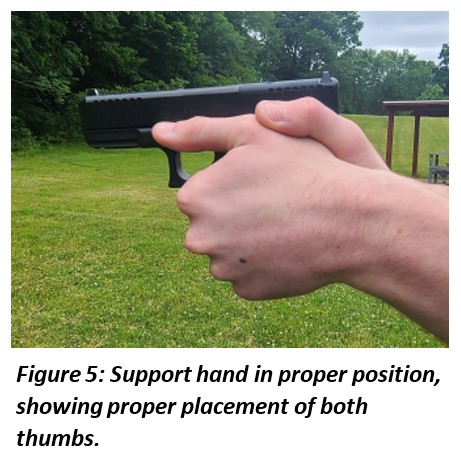 Remember earlier, when we said you should ‘flag’ the control hand’s thumb upward, to make room for the support thumb? Once the support hand is in the right place, you can now lower the control hand’s thumb and rest it along the top of the support hand (Figure 5). Be careful, with both thumbs to not let them drag against the slide; this is called ‘riding the slide’. The extra friction caused by ‘riding the slide’ can cause the gun to not cycle properly and malfunction, so make sure the support thumb is down low, straight along the frame below the slide, and the control thumb is resting along the top of the support hand, not on the slide. If the grip is proper, you will have even support in all directions around the gun.
Another point to discuss on how to grip the gun is the amount of force: how hard should you grip it? This is another area where new shooters (and even some experienced ones) get in trouble. Oftentimes, with the ‘good intention’ of trying to be precise in their control of the gun, people will grip the gun with much less pressure than they should, thinking that they are aiming ‘carefully’. This is a big mistake; it will lead to poor recoil management, and (surprisingly) poor control for the first shot. The broad-stroke rule is to squeeze the gun as hard as possible, up to the point of causing your hands to tremble. Clearly, if you squeeze too hard, you can induce trembling in your hands, which will affect accuracy. Therefore, squeeze the gun just a small amount less than that. For new shooters, that’s a good rule of thumb that will get you ‘most of the way there’.
For more experienced shooters, a little more advanced method is to think of firm control with your dominant hand, and a crush-grip with your support hand. This means you would use about 2/3 of your grip strength with your dominant (control) hand, and about 90% of your grip strength with your support hand… squeezing any harder will induce trembling or tremors, affecting your aim. While squeezing with slightly different strength with each hand may provide the optimal grip, new shooters may find it easier to simply think ‘grip hard with both hands but not to the point of trembling’.
If you establish your grip well (which is easy to do with some practice), you should never have to ‘re-adjust’ your grip while shooting. Newer shooters are often seen changing and adjusting their grip between shots; this is a sure sign that they never had a good grip in the first place and are probably an inexperienced shooter. Once the proper grip is established, it should not be released until the gun is re-holstered.
 There are two final areas related to the grip to talk about… first is the “push-pull” method of bracing the gun. This means that the shooter should “push” outward with the control hand, driving it toward the target, while at the same time “pull” backward with the support hand. This additional pressure (coming from both directions) helps stabilize the gun and helps mitigate shaking in the hands.
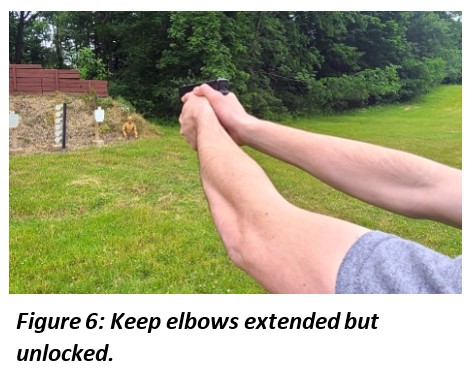
Finally, when you drive the gun out towards the target, the elbows should be extended and held firmly, but not locked (Figure 6). Having a small amount of recoil absorbing capability in the elbows will help minimize the gun’s movement from recoil and help get you back on target quicker for follow-up shots.
In summary, your grip on the gun is foundational to all other aspects of marksmanship…so grip the gun high, index your support hand to a repeatable point (some ideas how were given), and keep both thumbs pointed forward, but don’t ‘ride the slide’. Squeeze the gun hard, from all directions. When you drive the gun out towards the target, use the ‘push-pull’ method to stabilize the gun, and keep your elbows slightly unlocked. This may sound like a lot of steps, but after a little practice, it becomes second nature, and is the starting point towards “hitting the target”. Look for our second and third installments on this series, “Hitting the Target: The Big Three Factors” in coming weeks!
Like this article? Please share and leave your comments below!
Select Fire Training Center (SFTC) is the premiere training center and indoor shooting range facility in Northeast Ohio. Dedicated to offering a top-notch facility with highly skilled instructors, a wide range of classes and a state-of-the-art shooting range experience. We are here to serve your needs, make you feel welcome and we do this by offering you true customer service by friendly, knowledge people.
