Hitting the Target: The Big Three Factors
Part II: Sight Picture
A short while ago, we started a three-part series on shooting fundamentals called “Hitting the Target: The Big Three Factors”. Today, we’re on Part II in that series, this one will deal with the sight picture, which is what the shooter sees when they aim the gun at a target. Of the ‘Big Three Factors’, this might seem to be the most obvious one, as most people would know that you need to line the sights up…. but it’s still an area where many mistakes are made. Accuracy in handgun shooting comes from doing a series of tasks just right, and so we’ll take a few minutes and discuss the sight picture as part of that.
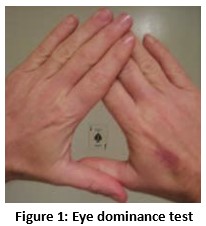 Before we do that, let’s talk about eye dominance. Everyone has a dominant eye; that’s the eye that your brain uses more information from to form an image. Often, the dominant eye is the same as the dominant hand; right-handed people tend to be right eye dominant, and vice versa…. but not always. To figure out which eye is dominant, extend your arms and hold your hands as shown in (Figure 1), with a small gap between your thumb and forefingers. With both eyes open, look at a distant object. Without moving your hands or your head, close one eye at a time. With one eye, you should still see the object, but with the other, you won’t. The eye that you see it with is your dominant eye. Remember which eye that is, and we’ll come back to that later.
There are two types of handgun sights, open (sometimes called ‘iron’) sights and red-dot type optics. The ‘pros & cons’ of these different types were discussed in an earlier article (check our previous articles in the Posts section of our website) so we won’t go into that here, but there are differences in how they are used, and this can make a big difference in how well you hit your target.
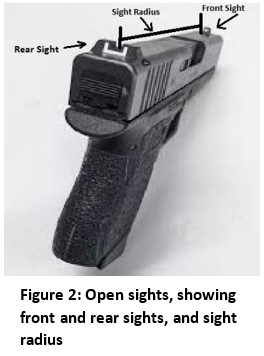 Most handguns come equipped with open sights from the factory. Generally, open sights include a front post sight and a rear sight; the rear sight is usually a notch (rifles sometimes use an aperture rear sight, though this is unusual on handguns). The distance between the front and rear sight is known as the sight radius and is driven by the barrel length (Figure 2). The longer the sight radius, the more precisely the gun can be aimed. The (generally) greater accuracy of long guns vs handguns is due to longer barrel length, which both helps stabilize the bullet, but also provides for a longer sight radius.
A common ‘rookie shooter’ mistake is to close one eye and sight the gun just using your dominant eye. Though this can be easier initially, it’s not the best practice, as you lose all the peripheral vision (and situational awareness) from that eye. While a little tougher to learn initially, it’s better to learn to shoot with both eyes open. To do that well, the shooter should line the sights up directly in front of their dominant eye; if the sights are centered between both eyes, the shooter can see a confusing ‘double image’ of the sights. Some shooters like to turn their head very slightly (just a couple degrees) to help align only the dominant eye with the sights. This can make it easier to keep both eyes open, yet still clearly see the sights. Also, make sure you raise the gun to the sightline of your eyes; it’s another rookie mistake to duck your head down to see the sights.
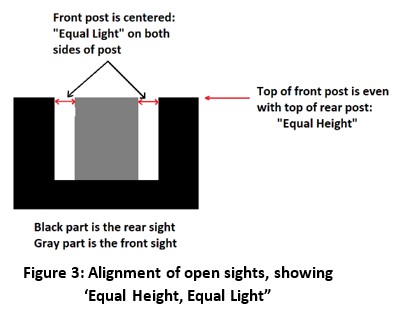 Using iron sights properly means getting the right sight picture…which is easy to describe but can be a bit more challenging to do properly in practice. The saying that is often used to describe the right sight picture is “equal height, equal light” (Figure 3). The first part of that saying means that the top of the front post should be at the same height (in the shooter’s line of sight) as the top edge of the rear sight; that’s “equal height”. The second part (“equal light”) means that the front post should be centered evenly in the notch of the rear sight, so that you can see an equal amount of light on both sides. Any misalignment, in either direction, means that you will miss the target.
While lining up the sights is a crucial step, ‘what’ should you align the sights on? This is called the ‘hold’, and to a large degree, it depends on the range to the target, and on the gun itself. Since most open sights don’t allow for elevation adjustments (many don’t even offer windage adjustment), allowance for where the bullet will hit in the vertical dimension is made by adjusting where on the target you align the top of the front post, in the sight picture.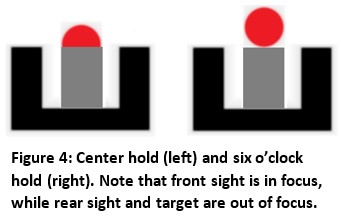 Two common ‘holds’ are the center hold, which places the front post sight directly over the center of the target, and the six o’clock hold, which places the target “on top” of the post, like an apple sitting on a post (Figure 4). In both cases, though, ‘equal height, equal light’ still applies. For most practical self-defense situations, the range is such that the difference in the hold makes little difference; at ranges of 10-12 feet, either will do the job. For more precision shots at longer range, the hold can make a difference. The shooter should test both holds at ranges they expect to shoot at to see what works best with their specific gun.
The final thing to discuss with open sights is where to focus. There are three possible places to focus: the back sight, the front sight, or the target. Which to use? Many new shooters might be tempted to say, ‘focus on the target’, but the right answer is to have a tight focus on the front sight and allow the target to be slightly fuzzy. The reason for this is that focusing on the front sight allows the shooter to properly align the sights (‘equal height, equal light’); focusing anywhere else increases the chance of misalignment, which will lead to missed shots.
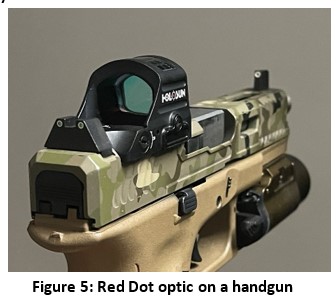 Equipping your handgun with a ‘red-dot’ (a) (Figure 5) can quickly improve performance and is generally easier to use than open sights. The reason that it’s easier to use is that there is only the single dot to place on target; no need to accurately line up front and rear sights. All quality optics are parallax-corrected, meaning that your eye does not have to be perfectly lined up along the barrel axis; wherever you see the dot is where the round will hit, assuming it’s been sighted in properly. This factor, along with the fact that you don’t have to align both front and rear sights, means it is much faster to get on target than traditional open sights.
However, despite its ease of use, there are still some things to be considered when using a red-dot optic. First, both eyes should be open, with the gun held in front of the dominant eye, just like was previously discussed. Turning the head very slightly to allow the dominant eye to line up will help with keeping both eyes open.
Next, the easy part: since the dot represents the point of impact (where the ‘well-sighted-in’ round will impact the target) (b), simply place the dot on the place on the target where you want the round to hit. That simplification, combined with not having to align front and rear sights, is what makes the red-dot optic so powerful. Provided that the sight is properly adjusted, the round will hit where the dot shows. This means there is no need to think about a ‘center-hold’, or a ‘six-o’clock hold’; just put the dot on the target and you’re good to go. The only difference is if you are taking a significantly different distance shot than what you are zeroed for, but in most defensive situations, that’s not the case.
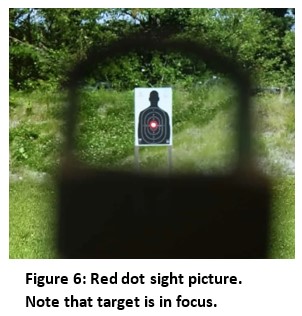 However, there is one important difference between using open sights and red-dot sights, and this is one that sometimes causes problems when long-time shooters of open sights begin to transition to red-dot optics. That issue is where to focus…. with open sights, the front sight is always the point where you must focus, for the reasons previously discussed. With red-dot optics, the focus should always be on the target, NOT on the red dot (Figure 6). Surprisingly, fixation on the dot (rather than the target) will usually lead to poor results and will (at a minimum) negate one of several advantages of the red dot, which is improved situational awareness; if you are focusing on the dot, you are not focusing on the target and what’s around it.
In closing, a few general comments can be made regarding the sight picture for either open sights or red dot optics. First, sight your gun in, and know where your gun will hit at the ranges you expect to shoot at. Also, remember that where to focus depends on the sighting system you have, with front sight focus for open sights, and target focus for red dot optics. Also, make sure you bring the gun up to the sight line of your eye, don’t make the rookie mistake of ducking your head down to the sights.
In either case (open sight or red dot), many new shooters make the mistake of trying to be too perfect and trying too long to line up the shot. Don’t try to be perfect…. you won’t be. Nobody can hold on a target without tiny movement; trying too hard to be perfect will tire you to the point of quivering, which makes it even worse. Instead, just try to minimize and slow the movement of the sights on the target.
Finally, remember that in terms of shooting fundamentals, the sight picture builds off the grip (Part I of this series); strength and steadiness of the grip will help the shooter establish a steady, accurate sight picture. This starts with a solid, effective grip, which then lets you build the sight picture properly.
In the final article, we’ll cover the last of the Big Three fundamentals, trigger pull…. look for that soon!
————————
(a) ‘Red dot’ is a generalized term used here to describe any optic that projects an aiming dot over the target.
(b) Proper sighting in is crucial for any weapon system. This will be discussed in detail in a later article.
Like this article? Please share and leave your comments below!
Select Fire Training Center (SFTC) is the premiere training center and indoor shooting range facility in Northeast Ohio. Dedicated to offering a top-notch facility with highly skilled instructors, a wide range of classes and a state-of-the-art shooting range experience. We are here to serve your needs, make you feel welcome and we do this by offering you true customer service by friendly, knowledge people.
