Hitting the Target: The Big Three Factors
Part III: The Trigger Pull
Well, folks, glad to have you back! Most of you reading this have probably already read Parts I and II of this series on handgun shooting fundamentals; Part I covered the proper grip, while Part II talked about the sight picture, for both open sights and red dot optics. If you haven’t seen those, take a look on our website (www.selectfiretc.com), under the Posts heading.
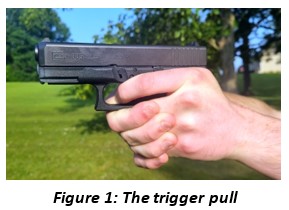
 Today, we’re going to address the last of the ‘Big Three Factors’ that affect how well you hit your target: the trigger pull (Figure 1). Like so many other aspects of shooting, this seems like a simple task, but there are subtleties, and if it’s not done right, the bullet doesn’t go where you want it to. How hard can it be to pull the trigger properly?
First, why is how you pull the trigger so important? That question is easy: a smooth & proper trigger pull will not disturb the sight picture, meaning the round will go where you are aiming. Any disturbance, though, will make an uncontrolled change in aiming direction a split second before firing, and lead to a miss. The trigger pull is the culmination of the entire process of gripping, aiming, and then firing the gun, and the interactions with the other parts are pretty obvious. A weak grip can easily allow small movements when the trigger is pressed (as well as affecting recoil control), and any disturbances to the sight picture will clearly affect where the round goes. So, what constitutes the proper trigger pull? From an overall sense, the notion is to smoothly press the trigger straight back and impart no motion to the gun in any direction as the trigger breaks (meaning when the round is fired). Saying this is easy: doing it is a bit more challenging, especially under stress. Note that the terms ‘press’ and ‘pull’ are used interchangeably here.
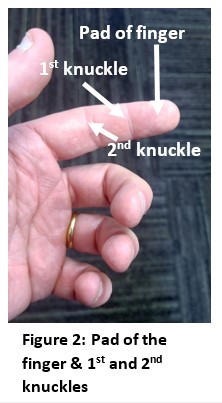
 The proper trigger pull starts with finger positioning. The pad of the trigger finger should be centered on the trigger; the inside of the first finger knuckle should NOT be touching the trigger (Figure 2). This can happen if the finger is too far into the trigger guard. Likewise, having just the tip of the finger is not good, as this may slip on the trigger, or impart a slight sideways motion during the trigger press.
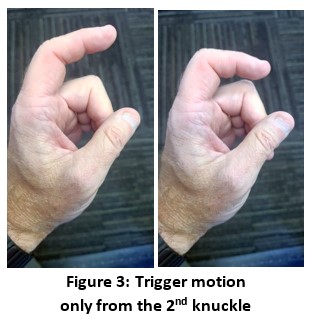
 When you are ready to press the trigger, the motion should be strictly from the second knuckle (Figure 3). This should be the ONLY movement of the finger; if the movement comes from the third knuckle (where the finger meets the hand), then it is impossible to pull the trigger straight back; if the third knuckle moves, there is movement of the finger towards the gun, which will disturb the sight picture. This is partly why a large fraction of ‘misses’ for right-handed shooters go low and left, due to improper trigger press (along with too soft of a grip). Lefties often will do the same thing in the opposite direction, low and right. The combination of proper trigger press (straight back, from the second knuckle) and proper grip (especially, pressing into the frame with the thumb of the support hand) will help stop that problem.
While seemingly simple, the trigger itself has characteristics which affect the trigger pull. There are a wide variety of triggers on handguns; though triggers are generally similar within families of handguns, they still can vary. Factors such as trigger geometry (curved vs straight triggers), trigger weight (how much force it takes to pull the trigger), take up distance (sometimes called travel, which is the distance the trigger can move until just before it breaks), the wall (the change in pressure required at the end of the take-up distance, just before it breaks), and trigger reset (how far the trigger must move forward, after the shot, to reset and enable another round to be fired) all affect how the trigger pull feels to the user, and can affect accuracy. Depending on how the weapon is intended to be used, gun manufacturers can change these factors to optimize the trigger. Guns intended to be primarily used for self-defense/combat tend to have longer take-up, and generally heavier trigger pull weight; this is to help prevent inadvertent discharges “in the heat of the moment”. The longer trigger travel and heavier pull weight require more of an “intentional” pull; a mere light touch is not likely to be enough to fire the gun. While this is safer (particularly under stressful situations), the longer travel and heavier pull weight can make it a little more difficult to achieve a clean, straight trigger pull, with no other movement. For this reason, competition triggers are made to have very short travel, and significantly lighter pull weight, so that minimal trigger motion is needed to fire. Personal defense/combat triggers typically have a 5-7 lbs. pull weight, while competition triggers are often 2 lbs. or even less. While providing for more accuracy, these light triggers are not recommended for everyday carry, as the stress of that situation can easily cause mistakes. Use of a competition-grade trigger should only be done in a range setting, with careful attention paid to trigger finger discipline (off the trigger until ready to shoot).
Now that we’ve talked about trigger characteristics, let’s talk about elements of the trigger pull itself…and how it should be done in different situations; we’ll call these two cases “combat trigger pull”, and “precision trigger pull”. First, let’s talk about the “combat” or self-defense situation. This is the case where you are both using the weapon defensively, and at very short range, perhaps about 7 yards or less. In a defensive situation at this range, there is likely little time to consider the steps of the precision trigger pull (which we’ll discuss in a moment). In this case, the concept is to simply press the trigger fully and smoothly to the rear in one motion, taking reasonable care to not move the gun as much as possible. In this situation, the trigger stroke should be full; pull the trigger smoothly and in one motion all the way back to its stop, then release it and allow it to fully travel forward. Of course, when the threat has been stopped, immediately take your finger out of the trigger guard. If done properly, very small deviations in the aimpoint won’t make too much difference at very short ranges.
Precision trigger control is a little different. This method can certainly be used on the range, but also can be used defensively for longer range, precision shooting. While this situation is unlikely in most defensive scenarios, it’s not impossible. For example, you might need to take a longer range shot in a situation where the threat is against someone else but further away. (a) However, precision trigger control must be practiced significantly to be used; great care must be taken with muzzle control and understanding the shooting environment (what’s in front of and behind the target). This type of trigger control can be done with either ‘combat’ or ‘competition’ triggers.
Precision trigger control starts with proper finger placement, as described earlier. The first step is called ‘prepping the trigger’; this simply means taking up the slack, or travel, in the trigger before the trigger gets to its break point (‘the wall’). Clearly, this is a delicate step; too much pressure will take you past the break point and fire the weapon. The reason for extra care when doing this should be obvious; prepping the trigger requires the shooter to know his/her weapon’s trigger extremely well, and to have practiced this (in both dry fire and live fire) many, many times to gain the tactile feel of where the take up ends, and the wall begins. Prepping the trigger should only be done while on the target and making only fine adjustments to the sight picture. Never, ever move while prepping the trigger.
Once the trigger is prepped, you are at ‘the wall’: only slight additional pressure will be needed to break the trigger and send the round. When the sight picture is where you want it, add slight pressure. It is important to allow yourself to “be surprised” when the trigger breaks; if you anticipate the break, you will likely flinch, and disturb the sight picture… and miss. Just add slight pressure when you are at the wall and let yourself be surprised by the shot.
After the shot comes the trigger reset; in timed competitions, this is important to get quick follow up shots. The trigger must be pulled far enough to allow it to break, but many triggers (especially combat type triggers) will have overtravel, wherein the trigger can travel farther than needed. Competition triggers are generally adjusted to minimize this overtravel. For precision shooting, once the trigger has broken, allow the trigger to return forward just far enough to reset and allow the next round to be fired; just like prepping the trigger, this can only be learned through considerable practice, to get the feel for the trigger of your weapon and how it responds. Pulling the trigger farther than necessary (overtravel) simply takes more time, and then requires a longer reset. Some competition triggers have adjustable reset, to minimize this. The concept in precision trigger control is to minimize the total trigger movement, which helps minimize overall gun movement. Of course, the reset occurs on the heels of recoil control of the weapon, so care must be taken to not accidentally fire an additional round during the reset. Trigger finger discipline is crucial, especially with this method.
With a good amount of practice, the precision shooter will get the feel for prepping the trigger, how much pressure is needed to break past the wall, and how the reset feels. While this method can help improve accuracy, the dangers of inadvertent discharge are significant. Precision trigger control should only be attempted by experienced shooters who understand their weapon (and the risks), as well as their situation, and have practiced the technique safely beforehand. Considerable dry fire practice should be done before attempting precision trigger control with live rounds, even at the range. A product such as the Mantis X system (discussed briefly in a previous post) can help the shooter measure his/her trigger pull in dry fire practice, to optimize it.
In summary, the trigger pull is all about pressing the trigger in such a way that the gun doesn’t move. This always starts with proper finger position and involves movement only at the second knuckle. In most defensive situations, the trigger pull should generally just be simplified into the concept of a smooth, steady pull. Precision trigger control can, if done properly, improve accuracy, but it does increase the risk of inadvertent discharge and should only be done in the right situation, and with extreme care.
We hope you have enjoyed this three-part series on “Hitting the Target: The Big Three Factors”. Take a look at our other posts and stop in at Select Fire Training Center to practice and improve as a shooter!
——–
(a) Always understand the accurate range limits of your weapon and your own skills and use good judgment.
Like this article? Please share and leave your comments below!
Select Fire Training Center (SFTC) is the premiere training center and indoor shooting range facility in Northeast Ohio. Dedicated to offering a top-notch facility with highly skilled instructors, a wide range of classes and a state-of-the-art shooting range experience. We are here to serve your needs, make you feel welcome and we do this by offering you true customer service by friendly, knowledge people.


